Showing posts with label Cake Slice Bakers. Show all posts

Sunday, April 20, 2014

The Cake Slice Bakers April 2014: Coconut Layer Cake

Good Morning and Happy Easter! He is Risen!!

This month's cake is what I would call our first real "cake" it's a true layer cake and frosting. I made mine early knowing that it would be perfect for Easter but figuring that since all but one cake in this book has been a flop for me that I didn't want to take that chance. The cake had good flavor, but it was best eaten the day of or next day as it became very dry, The frosting had good flavor but it didn't spread well, as you can tell in my pictures. Either way I would consider this a partial success just because it was a layer cake and I didn't take one bite and toss it in the trash.

Now to a bit of news. All of us at the cake slice bakers have been having issues with this book and many are not baking because of that. The powers at be got together and decided that instead of everyone baking the same cake each month instead they would get to choose which cake to bake out of the 4 chosen for the month. This will only pertain to this book and when we start our next book in November the rules will go back to the way they were before.


I am hoping to have some very exciting not having to do with anything baking related news to share with you all soon.....
 
See you next month
xoxo
Heather

Sunday, October 20, 2013

The Cake Slice October 2013: The Harvey Wallbanger

This was our last month to bake out of Vintage Cakes, since it's the last month we each get to choose our own cake to bake. This has been a great book to bake from. I missed several months of baking but the ones that I did manage to bake turned out pretty well. I had several months of ooohh's and aahhs, and a few of eewws too. Either way I've enjoyed this book and I am so glad I have it in my library now. I will be going back to it in the future and baking more.


I wanted something fun to bake this month so I chose the Harvey Wallbanger, it's an adaptation of the drink and I have to say it was delicious. I did opt out of one of the liqueurs just because I wouldn't have a use for it after this, so I just substituted a bit of brandy for it. This cake was good and I would make it again. On top of my hope that this cake would be delicious I really just wanted to make it for it's name. Yes sometimes I am very child like, it's a gift :)


Thanks for following along this year as I made a major life changes and putting up with me. We have a new book to begin baking with and I am so excited to share it with you over the next year.


xoxo
Heather

Friday, July 27, 2012

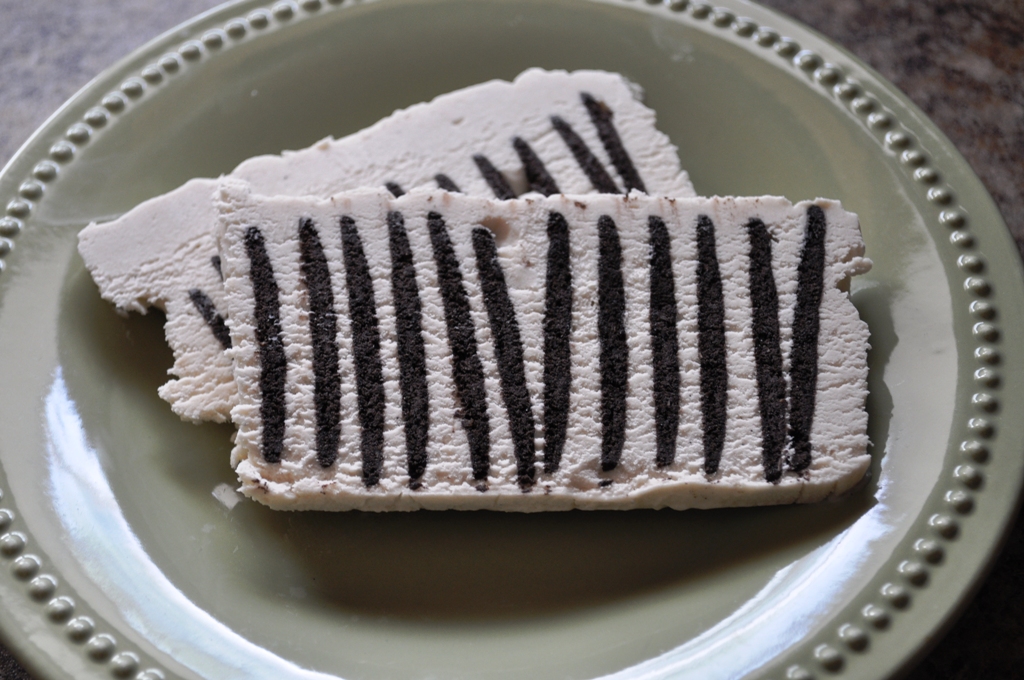
White Chocolate Vanilla Bean Kahlua Icebox Cake

This month's Cake Slice Bakers challenge was for a white chocolate espresso icebox cake. Well we really aren't fans of coffee at this house (unless it's my homemade Kahlua) so I subbed out the espresso beans for vanilla beans and then added a touch of Kahlua to it in the end. It was delicious with just a hint of that Kahlua flavor.


We left for the beach last week and in the rush to get out of here I didn't have time to post this. Please accept my apologies.


Icebox cake


You’ll need:

¼ cup water

1 ½ teaspoons powdered gelatin

2 ¼ cup heavy cream

1 vanilla bean – split in half and scrape out seeds –save it all

9 ounces white chocolate – I used nestle white chocolate chips

2 teaspoons vanilla extract

1-3 tablespoons kahlua or other coffee liqueur. The recipe called for hazelnut liqueur.

Nabisco famous chocolate wafers. They are usually near the ice cream supplies J


1.      Line a loaf pan with plastic wrap both ways so that the plastic hangs over the edges and you’ll have enough to wrap over the cake.

2.      Pour water into a heat proof cup, a small measuring up works great for this, add the gelatin and let sit and soften for 5 minutes.

3.      While the gelatin is doing its thing, put ½ cup heavy cream in a sauce pan with the vanilla bean. Bring the cream to a boil over medium heat. Remove pan from heat and let mixture sit for 15 minutes (or more)

4.      Meanwhile put the cup of gelatin in a small skillet or saucepan, pour enough water around cup that it comes about halfway up the sides. Heat the water while stirring the gelatin until the gelatin is completely dissolved.  Turn off the heat but leave the gelatin in the hot water (this will keep it from setting up before you want it to)

5.      Place the white chocolate in a large bowl

6.      Remove the vanilla bean from the cream, return the pan to the stove and heat until it gently boils. Pour the hot cream over the white chocolate. Let the mixture stand for 30 seconds and then whisk until it is smooth and completely melted. Whisk in the vanilla extract and kahlua. Set aside to cool for around 15 minutes.

7.      In the bowl of an electric mixer add the remaining heavy cream (it works well to chill your bowl and whisk before doing this) beat until soft peaks form, gently whisk about 1/3 of the cream into the chocolate mixture then fold in remaining cream.

8.      Scrape about 1 ½ cups of mousse into the prepared pan, smooth it into even layer. Using a small metal spatula spread about 1 tablespoon of mousse onto one side of the wafer, put it up against the long side of the pan, repeat until you are on the other side of the pan, you will need to do this 3 times to fill the pan. Spread the remaining mousse across the top and then cover with the plastic wrap. Freeze for at least 4 hours to set up. It will stay good in the freezer for days J  


It said to let it sit at room temp for 10 minutes….we didn’t it was still good J

Wednesday, June 20, 2012

Chocolate Blackout Cake

This month's Cake Slice Bakers challenge was a Chocolate Blackout cake.

It takes a bit of work and some patience but in the end it's super moist and yummy. C and M didn't care for it all that much, but the rest of us did.


I'm having issues posting the recipe, but if you would like it I would be happy to send it to you.

Sunday, May 20, 2012

Individual Meringue Cups with Lime Cream and Fresh Berries

This month The Cake Slice Bakers were challenged to make meringue cups with lime curd and fresh berries. I did a bit of tweaking on mine, as I was out of limes, but I had plenty of lemons. Then after I had made them I realized that my children had eaten all the fresh berries earlier that day and living where we live there is no such thing as a quick trip to the store. I went without the berries and it was still delicious though not as pretty as so many others were. This is something I will make again this summer, it's super easy to double, it's light and cold so a perfect summer dessert.
Individual Meringue Cups with Lime Cream and Fresh Berries


Here is the recipe: (Makes 6 Individual Meringues)
Ingredients:


Meringue Cups:
4 Large egg whites at room temp.
Pinch of salt
1/4 tsp. cream of tartar
1 cup (7 oz) superfine sugar


Lime Cream:
4 large egg yolks
1/2 cup granulated sugar
6 tbsp. freshly squeezed lime juice
4 tbsp. unsalted butter (cut into tablespoons)
1 tsp. finely grated lime zest
3/4 cup heavy cream


Fruit Topping
2 cups mixed fresh berries

Confectioner's sugar for dusting.

Make the Meringues:

1. Preheat oven at 225F. Trace six 3 1/2" circles onto a sheet of parchment paper. Turn parchment paper upside down and place it on the baking sheet.

2. In the bowl of an electric mixer, using whisk attachment, beat the egg whites at med. speed until foamy Add salt and cream of tartar and beat at med.-high speed until soft peaks begin to form. Gradually add the sugar, about 1 tbsp. at a time, then increase speed to high and beat the whites until stiff peaks form.

3. Scrape meringue into a large pastry bag fitted with a medium plain tip. Starting in the center of each circle, pipe a spiral of meringue in toward the edge, filling the circle completely. Pipe a ring of meringue around the edge of each circle. Pipe another ring of meringue on top of the first to form cups. (I used a star tip)

4. Bake meringues for 2 hours or until they are very lightly colored and dry to the touch. Let them cool completely (I was running late, so I turned off the oven at 1 hour and 40 minutes, cracked the door with a wooden spoon and left them. They were fine)
Make the Lime Cream

1. Set a fine mesh over a medium bowl and set aside. In a medium heavy saucepan (making sure it's perfectly clean, stainless steel and has no traces of grease in it) whisk together the egg yolks and sugar until blended. Stir in the lime juice and butter and cook over medium heat, whisking constantly until the mixture turns opaque and thickens enough to leave a path on the back of a wooden spoon when you draw your finger across it. Remove the pan from the heat and immediately strain the custard through the sieve pressing it through with a rubber spatula. Stir in the lime zest. Set the mixture aside while you whip the cream or if you are not ready to serve the meringues, refrigerate the mixture, covered until ready to use.

2. Shortly before serving, in the bowl of an electric mixer, using the whisk attachment, beat the heavy cream at high speed until medium-firm peaks form. Place the bowl of whipped cream in refrigerator.

3. If the lime mixture has not been refrigerated, set the bowl containing the lime mixture in a large bowl filled about one third of the way with ice water (be careful that the water doesn't splash into lime mixture). Stir mixture frequently until is slightly cooler than room temp. (about 10 minutes)

4. Fold a large spoonful of the whipped cream into the lime base to lighten it. Gently fold in the remaining cream.

5. Spoon the lime cream into the meringue cups, dividing it evenly. Top each meringue with mixed berries, then dust lightly with confectioners' sugar and serve.
STORE the unfilled meringue shells in an airtight container in a cool dry place for up to 5 days, once filled they should be served immediately.

Friday, April 20, 2012

Cinnamon Swirl Pound Cake

This month the cake slice bakers were challenged with a Cinnamon Swirl Buttermilk Pound Cake, last year I was on a kick trying to find the perfect pound cake, I never completed that challenge. This one though with a bit of tweaking might just end up being the perfect pound cake and by tweaking I mean leave out the cinnamon swirl, orange zest and cardamon. It's lovely just as it is, as is perfect for dessert or to be served along side a bit of fruit and tea for a weekend breakfast....but I am thinking of making it again without the added goodies and seeing how it works with strawberries....yum!

The cake tasted wonderful, my only issue with it was it stuck. My cakes never stick. I am a bit of an overzealous butter and flourerer, so I was truly disappointed when it didn't come out perfectly.


Give this one a try, you won't be sorry.

Cinnamon Swirl Buttermilk Pound Cake
from The Cake Book

Cinnamon Streusel Swirl:
1/2 cup all-purpose flour
1/3 cup firmly packed light brown sugar
1/4 teaspoon ground cinnamon
1/8 teaspoon salt
3 Tablespoons unsalted butter, melted

Buttermilk Pound Cake:
2 cups all-purpose flour
1/2 cup cake flour
1 teaspoon baking powder
1/4 teaspoon baking soda
1/2 teaspoon salt
1/8 teaspoon ground cardamom
1 cup unsalted butter, softened
2 cups granulated sugar
3 large eggs
2 teaspoons vanilla extract
1 teaspoon finely grated orange zest
1 cup buttermilk

Position a rack in the center of the oven and preheat the oven to 325 degrees F. Grease the inside of a 10-inch Bundt pan. Dust the pan with flour and shake out the excess.

For the Cinnamon Swirl: In a small bowl, whisk together the flour, brown sugar, cinnamon and salt, breaking up any large lumps of brown sugar. Add the melted butter and stir until blended and crumbly.

For the Pound Cake: Sift together the flours, baking powder, baking soda, salt, and cardamom (or nutmeg) into a medium bowl. Whisk to combine, and set aside.

In the bowl of an electric mixer, using the paddle attachment, beat the butter at a medium speed until very creamy, about 2 minutes. Gradually add the sugar and beat at medium-high speed until well blended and light, about 4 minutes. At medium speed, add the eggs one at a time, beating well after each addition and scraping down the sides of the bowl as necessary. Beat in the vanilla extract and orange zest. At low speed, add the dry ingredients in three additions, alternating with the buttermilk in two additions and mixing just until well combined.

Scrape half of the batter into the prepared pan and smooth it into an even layer. Sprinkle the streusel mixture evenly over the batter. Scrape the remaining batter on top and smooth it into an even layer.

Bake the cake for 65 to 75 minutes, until a cake tester inserted into the center comes out clean. Cool the cake in the pan on a wire rack for 15 minutes.

Invert the cake onto the rack and let cool completely. Dust the cake lightly with powdered sugar right before serving.
Enjoy!

Tuesday, March 20, 2012

The Cake Slice Bakers March Challenge:

Our march challenge was to make individual warm chocolate cakes. Much like a lava cake would be. They were really good though if i were to make them again I would under bake them and use less bittersweet chocolate. While I am a chocolate lover I am not a dark or bittersweet chocolate fan. I grew up on milk chocolate and I guess some things just never change.


We had ours with a bit of vanilla bean ice cream and it was delicious even though they didn't turn out to be as gooey as they should have been.


Individual Warm Chocolate Cakes
Makes 6 cakes
You will need 6 six ounce ramekins.

9 ounces bittersweet chocolate* coarsely chopped
4 tablespoons unsalted butter
1/2 cup sugar, divided
4 large eggs separated
1/8 teaspoon salt
1/4 teaspoon cream of tartar

1. Position rack in the center of your oven and preheat to 375 degrees. Butter the ramekins and then dust with some extra granulated sugar (not part of the 1/2 cup)

2. Put the chocolate and butter in a heat proof bowl over a pot of gently simmering water, make sure the bowl does not touch the water. Heat until the chocolate and butter and melted and smooth

3. Remove from heat and whisk in 1/4 cup sugar, whisk in the egg yolks.

4. In the bowl of an electric mixer using the whisk attachment beat hte egg whites with salt and cream of tartar until still peaks form. Gently fold the egg whites into the chocolate mixture. Divide evenly among the prepared ramekins.

5. Place ramekins on a baking sheet (easier to move) and bake for 15-20 minutes or until they have just cracked on top. Let the cakes stand for 1 minute before un-molding.

6. To un-mold just run a paring knife around the edge then place a plate on top. Invert the cake and it should slide out. You can also dust it with a bit of powdered sugar at this point.

7. Serve immediately with whipped cream or ice cream.

Enjoy!


* I used half semi-sweet and half bittersweet. Next time I would use mostly or all semi-sweet instead, and perhaps just cut a bit of the sugar out.

Monday, February 20, 2012

The Cake Slice Bakers February Challenge: Boston Cream Pie

This month our challenge was to make boston cream pie. I've made a few of these before, so I was curious of  how this one would turn out. As I've found more often than not, butter cakes tend to dry out quickly and need to be served the same day as they were made.  This one is no exception to that rule. Really if you can make it and serve it the same day.


I needed them to be a bit more portable than an entire cake would be so instead I am cupcakes, cut out the center with my smallest biscuit cutter, filled with with the cream and then topped with the chocolate glaze....they were yummy!

Boston Cream Pie
from The Cake Book

1 recipe Vanilla Custard Filling (make and chill prior to baking the cake)

1 recipe Hot Milk Sponge Cake

1 recipe Chocolate Glaze


For The Vanilla Custard Filling:
3 large egg yolks
1/4 cup granulated sugar
2 Tablespoons cornstarch
1 cup whole milk
1 Tablespoon unsalted butter
1 teaspoon vanilla extract
1/4 cup heavy cream

In a medium bowl, whisk together the yolks, sugar and the cornstarch, set aside.

In a medium saucepan, bring the milk to a gentle boil. Remove the pan from the heat and whisk about 1/3 cup of the hot milk into the yolk mixture. Return the entire mixture to the saucepan, place over medium-high heat, and bring to a boil, whisking constantly, for 1 minute. Remove the pan from the heat, scrape the bottom of the pan with a spatula, and whisk until smooth. Whisk in the butter until melted.

Immediately strain the custard through a fine-mesh sieve into a medium bowl. Whisk in the vanilla extract. Cover the surface of the custard with plastic wrap, and let cool to room temperature, then refrigerate for two hours, or until well chilled.

Just before assembling the cake, transfer the custard filling to the bowl of an electric mixer. Add 1/4 cup heavy cream and using the whisk attachment, beat the mixture at high speed until it is light and forms soft peaks, about 1 minute.


For The Hot Milk Sponge Cake:
1 1/2 cups sifted cake flour
1 1/4 teaspoons baking powder
1/4 teaspoon salt
1/2 cup whole milk
4 Tablespoons unsalted butter, cut into tablespoons
3 large eggs, at room temperature
3/4 cup granulated sugar
1 teaspoon vanilla extract

Position a rack in the center on the oven and preheat the oven to 350 degrees F. Grease the bottom and sides of a 9-inch cake pan. Dust pan with flour.

Sift together the cake flour, baking powder, and salt two times. Set aside.

In a small saucepan, combine the milk and butter and heat over medium heat just until the butter is melted. Remove the pan from the heat and set aside.

In a bowl of an electric mixer, using the whisk attachment, beat the eggs at high speed until blended, about 1 minute. Gradually add the sugar and vanilla extract and beat until pale and tripled in volume, about 6 minutes.

Sift one-third of the flour mixture over the egg mixture and gently fold it in with a rubber spatula. Repeat with the remaining flour mixture in two more additions.

Reheat the milk mixture to just under a boil. Add it all at once to the egg mixture and gently fold it in. Scrape the batter into the prepared pan.

Bake the cake for 20-25 minutes, until it springs back when lightly touched and a cake tester inserted into the center comes out clean. Cool the cake in the pan on a wire rack for 10 minutes.
Run a paring knife around the edge of the pan and invert the cake onto the wire rack. Re-invert the cake, so that it is right side up.


For The Chocolate Glaze:

3 ounces semi-sweet or bittersweet chocolate, finely chopped
1/2 cup heavy cream
1/2 teaspoon vanilla extract

In a small saucepan, bring the cream to a boil. Remove from the heat and add the chocolate to the pan. Stir until the chocolate is completely melted and the glaze is smooth. Stir in the vanilla extract. Transfer the glaze to a small bowl. Cover the surface of the glaze with a piece of plastic wrap and let cool for about 10 minutes before using.

Assemble The Cake: Using a long serrated knife, cut the cake horizontally in half to make 2 layers.

Save the smooth bottom layer for the top of the cake, and place the remaining cake layer cut side up on a serving plate. Scrape the filling onto the layer and, using a small offset metal spatula, spread it into an even layer. Top with the other cake layer, cut side down.

Glaze The Cake: Pour the warm glaze over the top of the cake, allowing some of it to drizzle down the sides. Serve the cake immediately, or refrigerate.

Store in the refrigerator in a covered container for up to a day. Bring to room temperature before serving.

Friday, January 20, 2012

The Cake Slice Bakers January Challenge: Tiramisu Cake

When we voted last month for the Tiramisu cake at first I wasn't really excited as I am not a huge coffee lover. I know I'm strange it's okay. Then later I thought about it and thought it would be perfect as my Mother-in-law's birthday was coming up and she loves coffee, see it all works itself out.


I have to be honest with you though I had a bite of this and thought it was awful, (I made a mini one to taste with the left over ingredients) so much so that I didn't serve it for her birthday. The favors were just off, and it tasted super bitter even though I followed each step exactly. I thought that I might try it again someday, but probably not.


If you would like the recipe please let me know and I will attach it.

Tuesday, December 20, 2011

The Cake Slice Bakers December Challenge: Buche De Noel

This month we chose to bake a chocolate yule cake. It's a chocolate cake with a hazelnut filling and then topped with a rich chocolate frosting. 


I've made pumpkin roll every year so this cake was pretty simple to make. You just need to make sure you have the timing down right. I made the hazelnut filling the day before and while the cake was cooling I made the chocolate ganach.


For the cake:

2/3 cup cake flour, sifted
2/3 cup granulated sugar
1/3 cup Dutch-process cocoa, sifted
1 1/4 tsp. baking powder
1/4 tsp. salt
2 large eggs, room temperature
6 tbsp. vegetable oil
1 tsp. vanilla extract
3 egg whites
1/4 tsp. cream of tartar
 
Syrup:
1/3 cup water
2 tablespoons sugar
1 teaspoon instant coffee
 
Frosting:
2 cups heavy cream
2 teaspoons vanilla extract
1 1/2 pounds chocolate chips/chopped chocolate


Preheat the oven to 350 degrees. Line the bottom of a standard rimmed cookie sheet with parchment paper, and then spray it with nonstick baking spray with flour.

Whisk together the cake flour, cocoa, 1/3 cup of granulated sugar, baking powder and salt.
 
In a separate, larger bowl, lightly beat together the eggs, oil and vanilla. Add the flour mixture all at once and stir until just combined.
 
Using your mixer and a clean bowl, beat together the egg whites and cream of tartar to the soft peak stage, about 5-7 minutes. Drizzle in the remaining 1/3 cup of granulated sugar and continue beating until the whites are stiff and glossy.
 
Fold a third of the egg whites into the chocolate mixture until just combined, then gently fold in the remaining whites. Pour the batter into the prepared pan and bake for 12-15 minutes, or until the cake springs back when touched lightly.
 
While the cake is the oven, thoroughly dust a clean dish towel with powdered sugar and lay out on the kitchen counter. When the cake is done, gently invert it onto the dish towel and remove the parchment paper.
 
Roll the cake up with the dish towel, starting at a long end. Place the entire roll seam side down on a cooling rack.

To make the syrup, combine the water and sugar in a small saucepan over medium-high heat, stirring constantly. When it boils, add the coffee, immediately remove the saucepan from the heat and allow to cool completely.
 
The frosting needs to be started the day before. Heat the heavy cream but do  not boil. Pour onto chocolate and let sit for a few minutes. Go back and stir until it is smooth and shiny. Put into the fridge and let cool completely. Put ganach into mixing bowl and mix until it is lighter in color, and easy to spread.
 
To assemble the cake, unroll the cake from the dish towel. Brush the cake thoroughly with the syrup. You may have some left over. 

Spread the frosting over the remainder of the cake. Carefully re roll the cake and place it seam side down on the desired serving platter. When re rolled finish frosting.
 
Enjoy!
 

Sunday, November 20, 2011

November Cake Slice Bakers

It's that time of the month again, it's time for The Cake Slice Bakers reveal. This month we made a Creamy Pumpkin Cheesecake with Ginger Pecan Crust.

I'm not a huge cheesecake fan, but J is and he loved it. He was a bit skeptical at first just like he is every time I make something new. It was good, the crust wasn't my favorite, but it complimented the cheesecake really well.


I forgot the pumpkin seeds, I had hungry people and they don't like waiting.


Creamy Pumpkin Cheesecake with Ginger Pecan Crust
From The Cake Book

Crust:
1 cup flour
1/4 cup brown sugar
1/8 teaspoon salt
1/3 cup pecans*
1/4 cup crystallized ginger
1/2 cup cold unsalted butter cut into 1/2" pieces
1 tablespoon cold water**

*I would toast them first next time
**I didn't need it.

1. Preheat oven to 350 degrees and lightly grease the bottom of a spring form pan 9" is best. Wrap pan with heavy duty foil as to prevent water seepage.

2. Place flour, sugar, salt, pecans, ginger in food processor and pulse until the pecans are finely ground, then running add in butter one at a time until it becomes coarse crumbs, add in water and process until dough starts to come together.

3. Press into the bottom only of pan and then bake in oven for 25-30 minutes. Set on cooling rack and cool completely.

4. Reduce temperature of oven to 325 degrees


Pumpkin Cheesecake Filling
1 cup pumpkin puree
1/2 cup heavy cream
2 teaspoons vanilla
1 teaspoon cinnamon
1/2 teaspoon ground ginger
1/4 teaspoon freshly ground nutmeg
1/4 teaspoon salt
1 1/4 pounds (2 1/2 bricks) of cream cheese (full fat is best)
1/2 cup sugar
1/2 cup brown sugar
1 tablespoon corn starch
4 large eggs

1. In a medium bowl mix together pumpkin, heavy cream, vanilla, cinnamon, ginger, nutmeg, and salt, set aside.

2. In you mixer bowl beat cream cheese until smooth, about 2 minutes, then add in sugars, mix on medium low until creamy, then add in pumpkin mixture and mix until blended. Add in the cornstarch and mix until just incorporated. Add the eggs one at a time, mixing well after each addition. Scrape down the bowl as needed.

3. Pour batter into the cooled crust, place the wrapped pan in a roasting pan and fill roasting pan with hot water until it comes up 1" along the pan. Bake in the water bath for 70-80 minutes or until the center of the cake is set, but slightly wobbly. The cake will set completely as it cools.

4. Remove from water bath immediately and place on cooling rack. Run a paring knife around the outside edge of the cake to prevent the top from cracking. Remove foil from pan and let cool completely. Place in the refrigerator to  chill for at least 4 hours before serving but overnight would be best.


Pumpkin Seeds
1/2 cup raw pumpkin seeds
1 large egg white
Pinch of salt
2 tablespoons sugar
1/8 teaspoon cinnamon

1. Preheat oven to 325 degrees and lightly grease a baking sheet

2. Place pumpkin seeds in a bowl. In another small bowl whisk egg white until just frothy. Add just enough egg white to pumpkin seeds to coat them. Add the sugar, salt and cinnamon, toss to coat the seeds well.

3. Spread seeds out on tray and bake for 15-20 minutes tossing them a few times.

4. Place on a cooling rack and break apart any pieces that may have clumped together.

Enjoy! xoxo

Monday, October 24, 2011

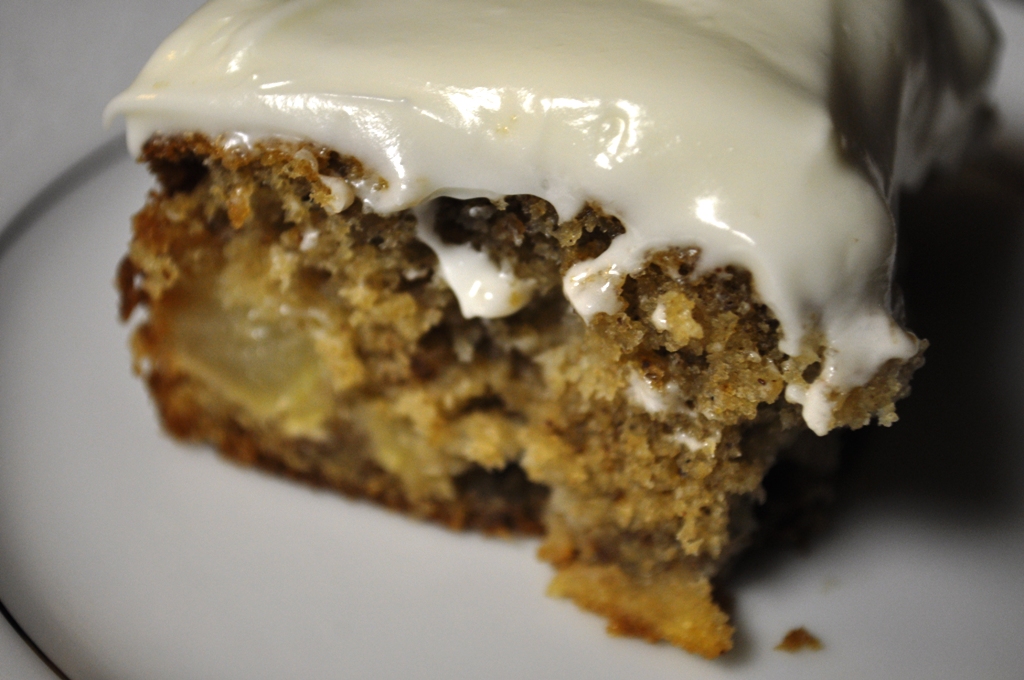
Apple Cake with Maple Frosting **Edited

** I posted this last Thursday. I not only forgot to edit, sorry about that. I also neglected to attach the recipe. I apologize. Please make this when you can. You'll love it.


This is my first cake as being part of The Cake Slice Bakers. I was so excited when I found out that I able to join there group. I'm pretty sure I got up and jumped around for a minute or two. The boys thought there was something wrong with me I'm sure. So now you will get to see all these wonderful cakes one each month. 

Our new book is The Cake Book by Tish Boyle. This month's cake is an Apple Cake with Maple frosting which you couldn't have picked a better cake for October really apple cake, it's perfect. This cake I can honestly tell you was so delicious. I made it and promptly ate a piece. Then knowing how good it was packaged it up and sent it off to Mom's office for them. It wasn't safe here.


Apple Cake with Maple Frosting
From The Cake Book by Tish Boyle

1 1/2 cups flour
1 teaspoon baking powder
1 teaspoon cinnamon
1/4 teaspoon cloves
1/4 teaspoon ginger
1/4 teaspoon baking soda
1/4 teaspoon salt
1/2 cup/1 stick unsalted butter-room temperature
1 cup brown sugar
1 teaspoon vanilla
2 eggs
2/3 cup buttermilk
2 cups apples (recipe called for Granny Smith I used what I had on hand-Gravensteins I think)
1/2 cup chopped walnuts (I used pecans not a walnut fan)

Preheat oven to 350 degrees, butter and flour a 9" square pan.

In bowl combine flour, baking powder, cinnamon, cloves, ginger, baking soda, and salt; set aside.

In the bowl of your electric mixer, using your paddle attachment beat butter until creamy, add in sugar and beat on med-high for about 2 minutes. Add in vanilla and eggs one at a time beating well after each addition. Scrap down bowl and add in 1/3 of the flour in 1/2 of the buttermilk, continue to do this until just combined. Remove bowl and add in apple and walnuts by hand.

Pour batter into prepared pan and smooth top. Bake for 25-30 minutes until toothpick comes out clean. Let cook in pan then flip out.

Maple Frosting


6 ounces cream cheese- softened
3 tablespoons unsalted butter-softened
1/2 teaspoon vanilla
1/8 teaspoon maple flavoring
1/8 teaspoon cinnamon
1/8 teaspoon ginger
pinch of nutmeg
pinch of salt
1 cup confectioners sugar

In the bowl of your electric mixer beat cream cheese and butter until smooth. Add in vanilla, maple, spices and salt. Mix in well. On low add in confectioners sugar and mix until blended, then beat on high for about 2 minutes until light and creamy.

Enjoy!
xoxo
Heather